I am sorry to say that I don't have any photographs to share of the kindergartners and their water exploration. I often find it impossible to take photographs of the experiments because I am kept busy volunteering at a station. I have to say, that the joy is having the kids enjoy the hands-on experiments, and to see the joy on their faces, and to see the light bulb moment when they really understand a new concept. I did a couple of experiments last Friday with the Kindergarten, we did the water exploration unit which involves the concepts of sinking and floating, density, and buoyancy. One thing I notice with the young kids is their willingness to explain things away as magical if they don't understand what is happening. I often received the magic answer when I asked why the water flowed down a wet string rather than down a dry string. Sometimes I receive the answer "God makes it do that". Some of the kids are happy to listen and develop an understanding of what is really happening at a station, and a few are happy to tune it out. I view it as a failure on my part to engage them in a clear explanation. I will keep trying however. My goal it to reach all the kids.
I have to say however, that the kindergartners present a particular kind of joy in learning that I find endearing. They are so excited to see new surprising things that the older kids have begun to look at with a look of worldliness. Again, I look on it as a failure on my part if they are not excited in the stations. But, that is the joy and challenge of volunteering with the kids. I want to engage every single child, have them wondering about the world around them, and to remember just a few things from the day. If we can engage them and show them science is fun at a young age, before middle school, maybe we won't lose them before that.
I really hate to hear that kids dislike science in second grade. Science is great fun, or should be. It is experimentation, figuring out the whys of the world, solving puzzles. I feel lucky that my dad passed this attitude on to me. I just hope I can pass that wonder on to a few of the children that I interact with through this program.
Tuesday, April 26, 2011
Simple Machines: Experiential Fun
The simple machines unit is a new one that I developed for the third grade. They have a unit on simple machines in the classroom, and then build a simple machine in class. These stations that I describe in an earlier post help them further their understanding of some of the machines. I covered: levers, inclined planes, pulleys, and screws. I worked the lever station, and had various parents and grandparent volunteers covering the other three stations. In my station I found some of the kids had a really good understanding of how levers worked, and others really didn't understand them at all. For example, I had three lever examples that I used: class 1, class 2, and class 3. In the class 1 lever, I asked, "Where is the load easier for me to hold, at the end of the lever or in the middle?" Often, the kids thought it would be easier to hold the load the closer I was to the fulcrum. I let the feel it for themselves, they were often surprised. I then asked them, "Is the load easier to lift if it is near the fulcrum or farther away?" Again, even if they answered the first question right, they often assumed that the load would be easier to lift if it were farther away from the fulcrum just as it is easier to apply the effort to lift the load if you have a longer lever arm.


One thing I found was that none of the kids had any experience with a spring gauge. Before we started the station rotation, I showed them two different gauges and we talked about how they worked. Then, they used the gauges in three of the stations to record information about how levers, pulleys and inclined planes worked.
We had two inclined planes set up: one six inches high, and another twelve inches high. We had them measure a load by hanging it from a spring gauge, then asked them to guess if it were easier to lift the load, or to pull it up an inclined plane. Again, often the kids thought it was easier to lift the load even though they had finished a unit on inclined planes and should have remembered that the inclined plane is used to make moving the loads easier.


Once they were finished with the experiments that I had written for them to do, we often had a bit of time to let them experiment. You can see them using the spring gauges in the above photos. One group decided to test my knowledge about inclined planes. They set the plane up at a very high angle and asked me what I though the bag of rocks would do and why. I asked if they were asking me to guess how much effort it took to lift the bag up the plane, but they said no, they wanted to know what I thought the bag would do at the top of the plane if they let it go. It was at a high angle and it was apparent to me that it would slide down. I answered that it would slide down. They looked surprised that I knew that. I asked them if they knew why it slid down. We then had an impromptu discussion about friction. I had this class last year run some experiments on ramps in which we had them slide things down a ramp, and then to slide the same objects down a ramp with sand paper on it. I asked if they remembered the experiments. They did remember them, and then I asked them why the object slid down the ramp with no sand paper and didn't slide down the ramp covered in sand paper. Then the light bulbs went off. It was a fun review lesson. It is also fun for me to find that they remember the experiments from previous years.
The pulley station went well, but we did not have enough for them to do in that station. Next year I think I will add a triple pulley.

The last station I had set up was one in which they compared coarse threaded and fine threaded bolts. I had them turn a nut 20 times on each type bolt and then to measure how far each nut traveled. We then had them make their own bolts our of pipe cleaners and dowels and to compare the paths up the dowel of the fine threads and the coarse threads. Finally, I had two pieces of foam board, each one the same length as the pipe cleaner lengths that I had them make their screws out of and we talked about how hard it was to climb up one ramp versus the other.

Overall, these stations were a success. I would use them again with a bit of tweaking in the pulley station to have them do more hands-on activities in that station. I would remove the third class lever from the lever station. The other two stations I would leave as is.
Tuesday, April 19, 2011
Water Exploration with Kindergarten
These are a set of experiments that I did with the kindergarten last year. I will be doing them again this week. They were popular with both the kids and the teachers. I will describe them here, and if you want the write-ups just leave a comment and your email and I will send it to you. I have not done the classic sink and float here, which is something that the teachers do in class with the students. I have tried to come up with other experiments that will get the students thinking and having fun.
First, we do a small sink and float with a twist. I take a small square of tin foil and fold it loosely and float it in the water. It does float. You can then take the foil and fold it tightly and it will sink like a rock. You then ask the kids what happened, and why it happened. The bigger piece of foil floats because of its greater surface area. When folded smaller and tighter, it is denser and has less surface area and sinks. Because of the lighting, it is a bit hard to see, but the piece on the left if floating and the piece on the right is at the bottom of the tub.

Next, we give each child a small square of foil and have them build a small boat. Then they can load the boat with one penny at a time until it sinks. They can then see how well each others boats did with loading. This is a fun experiment that the kids really love.

The next experiment addresses capillary action of the paper towel, and adhesion of the water to the paper towel. It is a tough concept to explain to kindergartners, so mainly we show them that the paper can pull up some of the water. It is just a fun project. The first photo below shows the paper towel with just a dot of food coloring on it, and the second photo shows the paper towel after it has been dipped and held in just a 1/2 inch of water allowing it to spread the color up the paper towel.


Another fun experiment that we do is to address density. This topic relates back to the idea of sink and float. If an object is denser than water it floats, less dense it sinks. In this experiment, we have a glass of water and a glass of alcohol side by side. We ask the students if ice floats or sinks. They will answer float and we will drop and ice cube in each glass. Surprisingly for the students, the ice cube floats in the alcohol. They will be shocked. Now ask them what happened. Teach them how to gently smell the contents of the glass by waving their hand over the glass toward their nose. They should recognize the smell of the alcohol from the doctor's office. Explain how ice is more dense than alcohol. Next, they can use a water dropper to add water to the alcohol jar to let the ice cube rise and the density of the liquid changes with the addition of water.


These are all fun. We do one more experiment, but because I did not have an assistant today I could not photograph it. In the last station, we have a tub, a large cup of water and a string. I ask the students what happens if I pour the water out of the cup, where does it go? Then I take a wet string and run it from the cup to the tub and pour out the water again. This time, the water follows the string. Next, have the students pick out a string and then pour the water. The string they pick out will be dry and of course the water will not flow down the string. They will be surprised it doesn't work. Then wet the string and show them how the water molecules attract each other through cohesion, which is why this experiment works!
Hopefully, I will be able to take some photos of the kids performing some of these experiments. I am just usually too busy working with the kids to take photos.
Monday, April 18, 2011
Simple Machine Experiments for 3rd Graders
My next engineering and science session is with the third graders. The third graders in Virginia study simple machines. Below is a portion of the science standards regarding simple machines.
The student will investigate and understand simple machines and their uses. Key concepts include

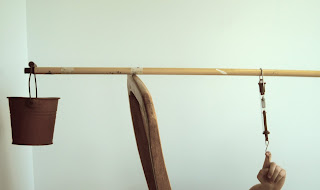
I use a broom stick without the broom attached, of course. For the class 1 lever, an example of which is a see-saw or crowbar, has the fulcrum or support point located between the load and the force or effort which is where the students will place the spring scale to look at how much effort is needed to lift the load they first measured in step 1. This result is dependent on where you place the fulcrum and where you place the effort, but for the example shown below we found the force needed to support the load was 0.7N or 200 grams.


- types of simple machines (lever, screw, pulley, wheel and axle, inclined plane, and wedge);
- how simple machines function;
- compound machines (scissors, wheelbarrow, and bicycle); and
- examples of simple and compound machines found in the school, home, and work environment.


For the second class lever, the load is located between the fulcrum and the effort or spring scale as shown below. Examples of a second class lever include a wheelbarrow, nail clippers, and a stapler. For the configuration shown below, the effort needed to lift the load was 3.7N.

The third class lever is shown below. It is a rather strange setup that requires someone to hold the lever at the fulcrum. The load is placed at the end of the lever, the support is in the middle. This lever requires more force than the load weighs. It takes 9 1/2 N to support the load of 5N. This lever is used to gain leverage when more force is needed at the end of the lever. An example is a pair of tweezers, where the tweezers can supply more force at the end to get out the splinter than you would be able to provide with just your fingernails.

The next station features inclined planes. In this station, the kids will be asked to weigh a load using the spring gauge. There is an inclined plane and the students will measure how much force is needed to pull the load up the plane with a height of 6 inches, and then to repeat the process with a height of 12 inches. In the experiment shown below, I measure the load hanging on the spring scale as 210 grams, up the 6 inch incline as 100 grams and up the 12 inch incline as 120 grams.

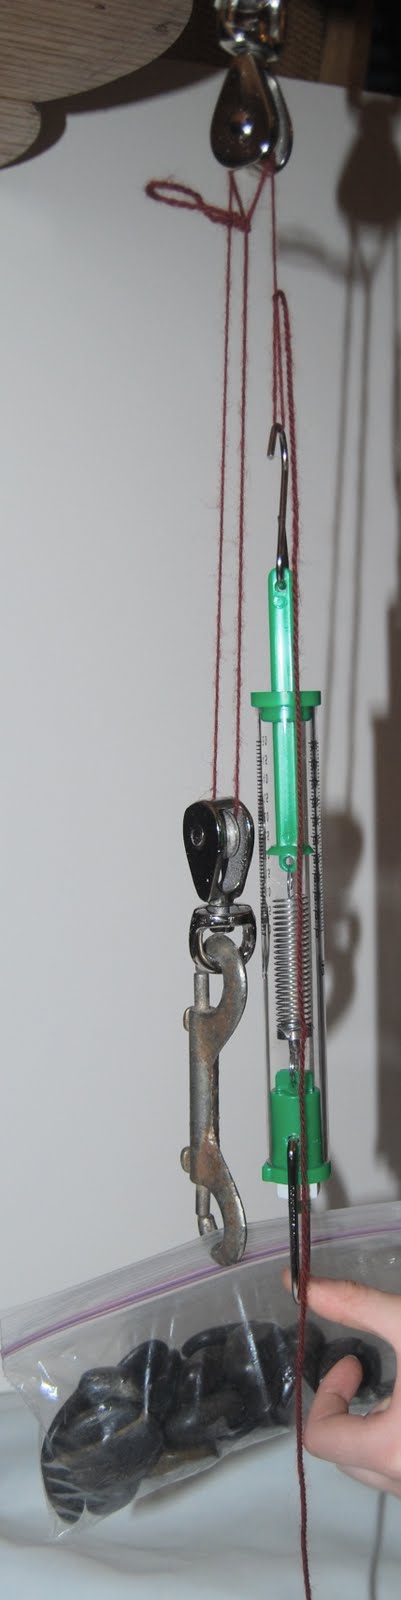
The pulley station has two setups, one for a single pulley, and one for a double pulley. This station will already be setup, the kids will measure the force needed to lift the load without a pulley, with a single pulley and with the double pulley as shown below.

The final setup will be for screws. In this setup, I will have a dowel with five inches marked at each end. The students will be asked to wrap the pipe cleaners around five inches of the dowel.


They can then see that the shorter piece takes fewer turns to go up the five inches, but is steeper. I will also have two boards or pieces of foam board cut to the same lengths as both these pieces of pipe cleaner. The students will be able to see that it takes less work to climb up the longer ramp than the shorter, steeper ramp, just as theoretically it would take less work to use a screw with finer screw threads than coarser threads, but it would take more time to screw it in.
Finally, I will have the kids compare two bolts, one with fine threads, the other with coarse threads. They will turn the nuts 20 times each for each bolt and see how far that translates into linear distance as shown in the photos below.


If you would like to receive a write-up of this unit, please get in touch.
Wednesday, April 13, 2011
Weathering and Erosion, Part 2
After more experimentation, I am going to finish showing photos of the experiments that we are going to run for Friday.
I tried the marble experiment again, but in reverse this time. Actually, freezing marbles overnight and carrying them to school packed in ice is much easier than boiling them at school and then freezing them. I took some marbles and froze them for an hour or so. I then took a coffee cup and boiled water in the microwave, which is something that I have easy access to in the school. I took a cold marble and dropped it in the cup and then, POP! The marble gave a nice little pop, and I poured out the water and marble and had a fractured marble.

I will do this experiment as a demonstration only, and I will wear eye protection. You should not pass the pieces of marble around as they have sharp edges and could easily cut a child.
The last station I will set up will be one that discusses water erosion. I will fill a couple of tubs with dirt, and a couple with small grass hill. The children will be given small watering cans.


As you can see, as you pour the water, as expected the dirt runs down the hill. The bottom shows how much runoff there is on the hills. With enough water you will see gullys form around the rocks that are shoved into the dirt.
In the tub with the grass, you can see there is still some runoff, but that runoff is from the bottom of the hill that is not covered by the grass. I think I will experiment to see if I can tightly pack the grass hill to prevent so much runoff.


So, these are the stations that we have setup. I will be happy to send the writeup if you are interested. Just contact me through this blog.
Sunday, April 10, 2011
Weathering and Erosion for Second Graders
On Friday I will be going into the second grade trying to educate and interest the second graders in various types of erosion. This topic is listed under Virginia Science Standards 2.7:
I will take you through my process of how I prepare before going into the classroom with an exercise like this. In this unit, there are five stations to be set up, however, one of the activities involves using boiling water, not something you can do with second graders. Instead, as the writeup recommends, I might try it as a demonstration. However, before I even use this activity, I will try all of the stations at home with my own kids. There are five activities:


Yeah!! This experiment is a keeper and will engage thie kids. Lucky for us, we have outdoor space for these experiments. I will just have to haul in some extra sand, after five classes with four groups each making waves, we could get some pretty mush sand!


This experiment also worked well. I will use it.
Next, I have to figure out what my fourth station will be. I am thinking of getting tubs filled with soil and rocks and having the students water it with watering cans. They can then observe the erosion. In other tubs, I can have soil with grass growing in it, and they can observe that little or no soil washes off that pile. I will do this experiment later today or tomorrow and take photos to post them. In the meantime, I have to produce a write up for all the teachers and the volunteers so they can read background on what the students should learn from each experiment, what questions they should ask the students, and include a data sheet so that students can record their findings like real scientists. I will post these sheets so that you can accesss them if you like.
In the meantime, I have asked some volunteers and teachers to write about their experiences with the program which I hope to post later in the week.
- Model the effects of weathering and erosion on the land surface.
- Land surfaces are subject to the agents of weathering and erosion. Land surfaces that are not covered with or protected by plants are more likely to be subject to the loss of soil by wind and water
- Weathering is the breaking down of rocks by the earth's atmosphere
- Erosion is the process by which the products of weathering are moved from one place to another.
I will take you through my process of how I prepare before going into the classroom with an exercise like this. In this unit, there are five stations to be set up, however, one of the activities involves using boiling water, not something you can do with second graders. Instead, as the writeup recommends, I might try it as a demonstration. However, before I even use this activity, I will try all of the stations at home with my own kids. There are five activities:
- Chemical erosion in which rock samples are subjected to a weak acid such as lemon juice or vinegar
- First, I have to locate some marble. Usually I will go beg for things in a store, or go through things we have laying around our farm. We do happen to have some marble tiles left over from a project. Another option is to use chalk.
- Other rock samples that don't react with acid are also needed such as granite, gravel, and brick
- Water erosion (this could be very messy!)
- Need a large container of dirt and poker chips and a watering can
- Pour water over a mound of dirt with poker chips embedded in the dirt
- Wind erosion
- Use sand and a small fan to blow the sand
- This seems like a good experiment for the kids to observe and an adult to manage
- Glacier erosion
- Using clay, sand and ice cubes
- Temperature erosion
- Uses boiling water, cold water, and ice to see what happens to glass marble that is subjected to hot temperature and then quenched
- First, I tried the temperature erosion activity. You are supposed to drop a marble in hot water, with the heat source on, leave the marble for five minutes, drop it into water and then into ice. I did this twice and nothing happened. I know that you are supposed to see cracking or splitting, but nothing! I am going to try this exercise in reverse to see if anything happens. I will publish the results. My guess is that the "new" marbles that I have are made differently from the "old fashioned" marbles we are used to seeing. Needless to say, I will not be using this exercise!
- Next, I used a marble tile to show chemical erosion using vinegar. There was no bubbling when I dropped the vinegar onto the marble, as indicated in the write-up stating that there should be. What does happen is less than dramatic. If you leave the vinegar on the marble for a few minutes you get some spotting, but for a group of 2nd graders, this is pretty boring, undramatic stuff. I am still thinking of using something like this exercise, but I may use chalk or pennies, but I still have to think about it.
- For the wind erosion, you are supposed to form a hill of sand in the middle of a tub and using a fan or hair dryer blow the sand around. I did this, and it does blow the sand around, but you also end up with sand particles everywhere! And, isn't that what we all expected? I may skip this one also. I can't really let the kids use a hair dryer by themselves, we would end up with sand absolutely everywhere. I am thinking of seeing if it is possible to do this with straws instead, but I will let you know after my kids and I try it. The drawback to letting the kids use straws is again having sand in other kids' eyes.
Wave erosion: This activity was not in my original list, but it has the advantages of being simple, using cheap materials that I have access to, and being a bit messy and easy enough for kids to do. First, I piled up some sand in a tub.

Next, I added a little bit of water to the tub, then I moved the tub back and forth making waves. I also had my kids do this exercise. They loved it! What is the result? I am sure you know: we get beach erosion.
Because this is a quick and easy experiment, you need to get a bit more of measurement in here. First, as the science class web site recommends, have some rulers on hand to measure the height and width of the "beach" and draw a sketch of the beach. Next, have the kids make five waves. Now measure the results, have them do it again five times, and measure again, and finally, five more waves and measure one more time. Have a data sheet ready for them to record the results. Here is what ours looked like after 15 or so waves:

Yeah!! This experiment is a keeper and will engage thie kids. Lucky for us, we have outdoor space for these experiments. I will just have to haul in some extra sand, after five classes with four groups each making waves, we could get some pretty mush sand!
Next, I tried another exercise called mechanical weathering. This exercise also worked well and again my kids loved this one also. In this activity, several rocks are placed in a metal can with a top, and water is placed in the can. The kids observe that clean water is placed in the can with the rocks.

Next, place the top on the can and have the kids shake the can for a minute or so by counting to 60 or using a clock. Once done, open the top, and voila: instant weathering!

The kids can instantly see that the water is no longer clear and that particles of rock were "weathered" off the bigger rocks. To be clear, I put different types of rock in there including a piece of brick. The red color is from the brick. Have the kids record their observations on the data sheet, and have them set the can aside. With time, and you may have to leave one for while to have this happen, I did not time how long this process took, but you will end up with clear water with sediment at the bottom.

This experiment is also a keeper. Plenty of action, something to learn, and good, clear results.
The next experiment I did was glacier erosion. In this experiment, which was written up in the teach engineering exercise, you are to provide the students with ice cubes, balls of clay, and some sand. First, the students are to flatten the balls of clay into a pancake, then take an ice cube and rub the ice cube over the clay and observe what happens.

The result is that not a lot happens. The clay is cold and wet, but that is about it. The students should feel the ice, it should be smooth as well as the clay. Next, have the students put a bit of sand on the clay and repeat the process. Have the students feel the ice cube. It should be rough from the sand rubbing it, and then have them brush the sand off the clay and observe it. Now the clay has lots of little pits in it.

This experiment also worked well. I will use it.
Next, I have to figure out what my fourth station will be. I am thinking of getting tubs filled with soil and rocks and having the students water it with watering cans. They can then observe the erosion. In other tubs, I can have soil with grass growing in it, and they can observe that little or no soil washes off that pile. I will do this experiment later today or tomorrow and take photos to post them. In the meantime, I have to produce a write up for all the teachers and the volunteers so they can read background on what the students should learn from each experiment, what questions they should ask the students, and include a data sheet so that students can record their findings like real scientists. I will post these sheets so that you can accesss them if you like.
In the meantime, I have asked some volunteers and teachers to write about their experiences with the program which I hope to post later in the week.
Subscribe to:
Posts (Atom)