Tuesday, November 22, 2011

Saving Humpty Dumpty

The kindergartners study nursery rhymes, so the teachers and I discussed what kind of activity we could find that would tie in.  We came up with the Humpty Dumpty Safety Device.  If Humpty Dumpty had been wearing one of these designs things might not have been too bad!

Within our 45 minute session, we told the children that they must design a safety device for Humpty Dumpty given the set of parts that were provided.  The parts can vary, but this year we included:

  • a straw
  • a paper clip
  • an index card
  • a 4x4" piece of bubble wrap
  • 2 cotton balls
  • 6 inches of pipe cleaner
  • 3 or 4 pieces of styrofoam peanuts
  • and 12 inches of tape.
Last year we included a small cup, and none of our hard boiled eggs cracked.  This year I decided to replace the cup with the index card.  The results did change.  

The designs varied to some degree.  Some groups were more engaged than others.  Often the kids just wrapped up the egg in some form of another without real thought to how to protect the egg.  One of these designs is shown below.  Some of these groups only used a few of their materials.


Other groups used all of their materials and had an approach of putting everything in a somewhat haphazard manner.  Sometimes these designs worked, sometimes they didn't.


 Other groups spent a bit more time thinking about how to protect all of the egg.  The two designs shown below are built sort of like canoes with protection on all sides.  Depending on how well the sides are protected, this design worked reasonably well.


Another common approach was to build something that looked like a paper can.  Most of the time this design was not so successful.  The kids tended to protect the top and bottom of the egg, but neglected the sides which cracked in the drop.


The photo below shows our most innovative design.  The kids wanted to design a parachute.  I had my doubts about its success, however the egg survived with no cracks!


On average of the six groups in each class, only two were able to prevent Humpty Dumpty's demise, and the rest were cracked to some degree.  The kids were all good natured about it, save one girl who did cry when her team's egg was cracked.  However, having the boys cheering for cracked eggs probably did contribute to this situation.  In most classes, the kids cheered for all the teams and were good natured about the whole process.

The wall we used was built from card board bricks and taped down.  We rolled the designs off, and then opened them up to see how Humpty Dumpty fared.  We used boiled eggs, which did cause a few kids some confusion.  Those kids that had not had experience with boiled eggs were confused as to why the yolk didn't run out when they were cracked.


The last innovative design I want to show is the one below.  These kids built a type of spring out of the pipe cleaner and the straw.  The concept worked well, and kind of bounced on the floor, and prevented the egg from cracking.


 Overall, this activity went well.  I think next year I would eliminate the peanuts in favor of a different soft material.  Some of the kids could not help buy shred the peanuts, and I spend 15 minutes or so cleaning up the mess afterwards!  So, I would recommend forgoing peanuts.  As in all of the activities, it is a lot to pack into 45 minutes.  However, this is all the time that their schedules allow.  If we had more time, we would have the kids redo their designs and try again.  We did discuss how engineers design and test and redesign all the time.  That is part of their design and learning process.

The kids love this activity, and it is one that we will keep doing.


Tuesday, November 1, 2011

Bird Beaks

This year is quite busy.  I am now running sessions for all six grades (K-5), so I find it hard to take photographs while running the sessions and on a day to day basis, just getting stuff written  down for the blog.  So I apologize being so slow.

We ran a Life Processes session for the third grade a couple of weeks ago.  This is the second time I have run this session.  It certainly went better this year than last.  Here is the relevant section of the third grade standards requirements for Virginia:

The student will investigate and understand that behavioral and physical adaptations allow animals to respond to life needs. Key concepts include
a)     methods of gathering and storing food, finding shelter, defending themselves, and rearing young; and 
b)  hibernation, migration, camouflage, mimicry, instinct, and learned behavior.

I divided this activity into three parts.  There are similar exercises that you can find on the web:  1) Fetch!  "Eat Like a Bird" and 2) The Wonder of Birds.  First, I put out gathered materials that could be used as "food" for the birds.  I try and find what I have around the house, but used:  marbles, small rubber erasers, various sizes of dried beans, rubber bands, puffy balls, small rocks, hacky sack balls, plastic eggs, jar with tubes of water, and old logs, and seed pods.  I scattered the food and put some of the food in a tub of water.


We had the kids divided into groups of four.  Each group was then given an assigned "beak".  The beaks included: fork, spoon, chop sticks, toothpick, water dropper, and a straw.  For the first part of the activity, the kids were directed to come one person per team at a time and get one piece of food.  They were not to try and spend much time, but come up, get the food, and "fly back to their nest" with it.  Each team member had a chance to go.

We then discussed how things went and they were to try and decide what kind of bird their beak might represent.  The general consensus was:

fork:  water bird such as a spoonbill or flamingo that filters its food
spoon:  water bird that scoops its food such as a duck
chop sticks:  can be various birds such as a crow, blue jay, etc.
toothpick: small bird such as a small woodpecker or nuthatch
straw:  not a very effective beak, no real correlation
water dropper:  hummingbird

We then talked a little about how beaks were adapted for specific environments.  Next, we gave the kids an opportunity to design their own beaks.  They could select from the materials provided in the first activity, plus they could use rubber bands.


Once the kids had build their beaks, we reran the previous exercise with their own beaks. 


In the third part of the activity, we cleared the table of most food and left just a few things that the kids tended not to try and pick up and ran the exercise one last time.

We then discussed what happened.  In general, the kids tried to design a beak that allowed them to pick up the most diverse sets of food.  They all tended to pick up things out of the water first.  We then discussed what implications it had when we removed much of the food.  The answers to the food removal causes were:  seasonal changes, weather changes such as massive storms such as hurricanes, droughts, and a dying out of a food source due to environmental changes.  Finally, we discussed what strategies were available to the birds to overcome the food scarcity.  The strategies that we discussed were migration and adaptation.

The kids loved this exercise, and I think they got a lot out of it.  If you are interested, contact me and I can send you the writeup.

Saturday, October 15, 2011

Goop by any other name....

Last week I started our round of engineering and science activities for the year.  I am kept busy this year with one to two sessions each week now that I have grades K-5 participating.  Recruiting volunteers remains a challenge...But onto the important stuff.

We started third fourth out this year making homemade silly putty.  I found three different recipes on the web and decided to let the kids test them out to find out which worked the best.  My intention, you know the idea, "the best laid plans..."  and "the road to h___ is paved" with good ones, did not result in what I had hoped.  Making the transition from teaching college kids to elementary school kids is challenging.  I forget how much they can take in at one time and still tend to bombard them with information.  In any case, I had intended that we test the three different formulas to see how they performed, and how well they mixed up.  I think the kids just got that they could mix up the putty and have fun and I am not sure they got anything out of it other than that.

I had intended that the take a logical approach to making and testing different formulations and scientifically decide which was better.  Control of the mixing and product was difficult.  Let me explain why.  Here are the three formulations we used:


Formula A (red)
Formula B
(green)
Formula C
(blue)
Glue
1 teaspoon
1 teaspoon
1 teaspoon
Water
1 teaspoon
2 teaspoon
1 teaspoon
Borax Solution


1 teaspoon
Borax powder
1 teaspoon
2 teaspoons


When I did this at home I did not use food coloring.  I would definitely suggest you use the food coloring.  If you don't all the samples are white and it is really hard to tell them apart.


It makes for a bit more mess, but it is easier for the kids to keep up with everything.

First, we talked about safety.  Borax is a really safe detergent booster, but if ingested, a lot of it could make you sick.  There is that occasional child who likes to taste things....  We then talked about the attributes of silly putty.  The commercial silly putty is very stretchy, bouncy, and can take up images from newspaper really well.  I told them that these are the things we wanted to test for in our formulations.  I told them that we were looking for the best recipe for them to make again and to recommend to their friends.  Finally, I then asked the kids if they knew what a chemical reaction was and how to look for it.  They had covered this in class, and had several suggestions on looking for reactions:  blows up, bubbles, fizzes, changes color, smokes.  Very few had the idea that the mixture could give off heat.  I suggested they look for changes including heat. That of course is what happens when you mix the water and borax, you get some warming.

I then had the kids mix up the samples in the following order:  first mix the water and borax until it is really mixed up, last, add the glue and mix some more until it begins to ball up.  You can add the color at any time, but an adult should drop in the color.  We used two forms of borax: straight powder and a solution, which was 2 tablespoons of borax mixed with 1/2 cup of warm water.  The mixing process is a bit messy and can vary a LOT from child to child.  We did have some issues of the formulas not coming together or being too crumbly.  One child would have a great mixture, and at the next table the same formula would look totally different.  

Once the formulas were mixed and rolled into balls we tested them.


Formula A
Formula B
Formula C
Bounciness
                cm
                cm
                cm
Imprint Retention
                sec
               sec
               sec
Stretchiness
                cm
                cm
                cm
Pull


Ink Transfer
good  fair   poor
good  fair   poor
good  fair   poor


Again, as in the mixing of the formulations, the testing accuracy varied greatly.  I had the kids divided into teams of three and were supposed to work together the make the test the various formulas.  However, team work is hard for them.  They tended to work independently, but they had to help each other with some of the tests.

Here is a list of the tests we performed:

  1. Form the putty into a ball and see if you can bounce it.  Using a meter stick, see how high the ball bounces when dropped from 1 m. high.  Record on Activity sheet.  Do this for each formulation.
  2. Take your pencil or handle of spoon and make an imprint in the ball.  Record how long it takes for the imprint to disappear.
  3. Roll each ball into a 2 inch rope and slowly pull the rope and record how far it stretches before it breaks.  How far can you stretch it?  Measure with meter stick.
  4. Quickly pull each formulation and record the results.
  5. Flatten into a pancake, using a sheet of newspaper, test how well each formulation picks up the ink off of the newspaper.  Can you read it?  Record the results.

There were a couple of problems with the testing.  Imprint retention was VERY subjective.  The idea was to let the students see that silly putty acts a bit like a liquid in that with time it slowly moves to take the shape of its container like a liquid.  Then, if acted upon quickly like in the pull test, it will break more like a solid.  I believe the kids were too focused on playing with the putty to think and compare their results.  

The stretch test was a bit easier to perform if the kids followed directions, which of course many didn't. We laid the two inch rope of putty on a meter stick and slowly pulled.  Overall this test went well.


Finally, I had newspaper laid out for testing transfer of ink.  None of these formulas really transferred any ink to speak of.

In the end, the kids were not able to detect a clear winner on which formulation was the best.  It was so dependent on how well the kids measured and mixed that we didn't really take away what I had intended from this lesson.  I am not sure how I would change this for next year.  

As for me, there was a clear winner in the three formulations shown above.  The one made with the borax solution was a bit messier to mix, but in the end was more consistent than the other two formulations.

One thought for next year is to let the kids decide how to formulate the putty using the following table:


Control (red)
Formula A
(green)
Formula B
(blue)
Glue
1 teaspoon
1 teaspoon
1 teaspoon
Water
1 teaspoon
x teaspoon
xx teaspoon
Borax Solution
1 teaspoon
y teaspoon
yy teaspoon


One thought for next year is to let the kids come up with a variation on the control formula and use the borax solution approach.  I have not tested this procedure, but will have to look into it.

In any case, the kids had fun.  Half the battle at this age is to get them to have fun with science and engineering and to inspire them to learn more.  In that light, the activity was a great success.

Wednesday, September 7, 2011

Back to School

It is a busy time of year.  I have taken off the last three months enjoying the summer with my children.  Now they are in their third week of school and I am busy scheduling meetings.  This year we will be bringing science and engineering activities into grades K-5.  I have to admit, I am just a little nervous about getting it all done, but I am sure all will turn out well.

We now have the support of our Parent Teacher Organization and have an official volunteer signup with them.   I now have a more formal agreement with the University of Virginia and are busy trying to recruit students to help us.  Last week I met with the kindergarten teacher to set up our schedule and discuss any changes they want to our units.  This is the first year we will go forward with no changes to what we have.  After four years everyone is really happy with what we do with the children.  This year I will be adding more units to third and fourth grade and making changes.  We added those two grades last spring to our program.  I am meeting with those teachers over the next couple of weeks.  And, this year we are adding fifth grade, so I will be busy trying to figure out what kind of fun hands-on things we can do with them in a 45 minute time slot.

I will keep the blog up to date and hopefully find a way to post our activities.  Stay tuned for more....

Tuesday, May 3, 2011

Strength and Structures with Third Grade

Tomorrow we will be working with the third graders to introduce strength and structures.  The takeaway lessons we want them to get out of these experiments are:
  • The strength of a structure depends on its size and geometric shape as well as material composition
  • Structures react to loading by a force by lengthening, being compressed, or bending
  • If a load is too large, the structure may fail
The first station has them review the idea of balance on a beam.  This is a topic covered in first grade, but it never hurts to review!  In this exercise, a simply supported beam (i.e., a yard stick) will be used to allow the children to play with different loads and to see how to balance them.  If two equal loads are equal distance from the center support the beam is in balance.  If one load is moved, then the beam will be out of balance.  You can balance an unequal load by changing the distance from the support as shown below in the second figure.


There will be two yard sticks set up for experimentation at each station.  With 5 or 6 children at each station, that should give each child some hands-on time.  I will also put several blocks of the same size at the station so they can play with balancing different loads.

In the second station, the children will look at load deformation of the yardstick.  The yardstick will be simply supported at each end.  There will be several blocks at the station and the students will load the beam until it begins to deform.


As you can see from the above photos, with a small load there is very little, if any deformation of the yardstick.  However, with a large load, the beam begins to deform and you can see it sag in the middle.  The students will be given a pile of blocks so that they can load the beam and see how it changes with loading.

 As a second activity, we will have the students turn the yardstick on its side.  In this configuration, the beam is narrower, but many times thicker.  We will load the beam in this configuration, noting that you can place the same load on the beam as in the other configuration and in this configuration  it does not deform. 


In the third station, they will load a rubber band and see how it changes with loading.  First, the kids will measure the length of the rubber band.  Next, we will have them attach the an empty plastic bag supported by a paperclip, there is no real deformation.  As we load rocks into the bag, the rubber band begins to deform.  As more rocks are added, the rubber band stretches even further.  We will have them measure the load and the amount of deformation using a yardstick and a spring scale.  Finally, we will have them remove the load and see if the loading caused any permanent deformation of the rubberband by measuring its final length.


In the last station, we will investigate torsional strength.  Some materials can withstand a significant amount of torsional loading, whereas others cannot.  In this station, each child will be given a piece of chalk and asked to twist it until it breaks.  Then they will be given approximately the same sized wooden dowel.  They will be unable to break the wooden dowel in torsion.  Wood is stronger than chalk.  Next, they will be given a toothpick and asked to break it.  The toothpick could be easily broken even though it is made of wood.  However, it is very small compared to the dowel. 

The purpose of these exercises is to get the kids thinking about how size, geometry and material type can affect the strenth of a material under loading.  The third graders do study matter and material.  Below is the text associated with the third grade standards relating to matter:

  • infer that objects are made of one or more materials based on observations of the physical properties that are common to each individual object.
  • compare the physical properties of smaller pieces of a material to those physical properties of the entire material.
  • conclude that materials have their own set of physical properties that are observable.
  • explain that physical properties are observable characteristics that enable one to differentiate objects.
  • design an investigation to determine if the physical properties of a material will remain the same if the material is reduced in size.

Tuesday, April 26, 2011

On Teaching Science and Volunteering

I am sorry to say that I don't have any photographs to share of the kindergartners and their water exploration.  I often find it impossible to take photographs of the experiments because I am kept busy volunteering at a station.  I have to say, that the joy is having the kids enjoy the hands-on experiments, and to see the joy on their faces, and to see the light bulb moment when they really understand a new concept.  I did a couple of experiments last Friday with the Kindergarten, we did the water exploration unit which involves the concepts of sinking and floating, density, and buoyancy.  One thing I notice with the young kids is their willingness to explain things away as magical if they don't understand what is happening.  I often received the magic answer when I asked why the water flowed down a wet string rather than down  a dry string.  Sometimes I receive the answer "God makes it do that".  Some of the kids are happy to listen and develop an understanding of what is really happening at a station, and a few are happy to tune it out.  I view it as a failure on my part to engage them in a clear explanation.  I will keep trying however.  My goal it to reach all the kids.

I have to say however, that the kindergartners present a particular kind of joy in learning that I find endearing.  They are so excited to see new surprising things that the older kids have begun to look at with a look of worldliness.  Again, I look on it as a failure on my part if they are not excited in the stations.  But, that is the joy and challenge of volunteering with the kids.  I want to engage every single child, have them wondering about the world around them, and to remember just  a few things from the day.  If we can engage them and show them science is fun at a young age, before middle school, maybe we won't lose them before that.

I really hate to hear that kids dislike science in second grade.  Science is great fun, or should be.  It is experimentation, figuring out the whys of the world, solving puzzles.  I feel lucky that my dad passed this attitude on to me.  I just hope I can pass that wonder on to a few of the children that I interact with through this program.

Simple Machines: Experiential Fun

The simple machines unit is a new one that I developed for the third grade.  They have a unit on simple machines in the classroom, and then build a simple machine in class.  These stations that I describe in an earlier post help them further their understanding of some of the machines.  I covered: levers, inclined planes, pulleys, and screws.  I worked the lever station, and had various parents and grandparent volunteers covering the other three stations.  In my station I found some of the kids had a really good understanding of how levers worked, and others really didn't understand them at all.  For example, I had three lever examples that I used: class 1, class 2, and class 3.  In the class 1 lever, I asked, "Where is the load easier for me to hold, at the end of the lever or in the middle?"  Often, the kids thought it would be easier to hold the load the closer I was to the fulcrum.  I let the feel it for themselves, they were often surprised.  I then asked them, "Is the load easier to lift if it is near the fulcrum or farther away?"  Again, even if they answered the first question right, they often assumed that the load would be easier to lift if it were farther away from the fulcrum just as it is easier to apply the effort to lift the load if you have a longer lever arm. 


One thing I found was that none of the kids had any experience with a spring gauge.  Before we started the station rotation, I showed them two different gauges and we talked about how they worked.  Then, they used the gauges in three of the stations to record information about how levers, pulleys and inclined planes worked.

We had two inclined planes set up:  one six inches high, and another twelve inches high.  We had them measure a load by hanging it from a spring gauge, then asked them to guess if it were easier to lift the load, or to pull it up an inclined plane.  Again, often the kids thought it was easier to lift the load even though they had finished a unit on inclined planes and should have remembered that the inclined plane is used to make moving the loads easier. 


Once they were finished with the experiments that I had written for them to do, we often had a bit of time to let them experiment.  You can see them using the spring gauges in the above photos.  One group decided to test my knowledge about inclined planes.  They set the plane up at a very high angle and asked me what I though the bag of rocks would do and why.  I asked if they were asking me to guess how much effort it took to lift the bag up the plane, but they said no, they wanted to know what I thought the bag would do at the top of the plane if they let it go.  It was at a high angle and it was apparent to me that it would slide down.  I answered that it would slide down.  They looked surprised that I knew that.  I asked them if they knew why it slid down.  We then had an impromptu discussion about friction.  I had this class last year run some experiments on ramps in which we had them slide things down a ramp, and then to slide the same objects down a ramp with sand paper on it.  I asked if they remembered the experiments.  They did remember them, and then I asked them why the object slid down the ramp with no sand paper and didn't slide down the ramp covered in sand paper.  Then the light bulbs went off.  It was a fun review lesson.  It is also fun for me to find that they remember the experiments from previous years.

The pulley station went well, but we did not have enough for them to do in that station.  Next year I think I will add a triple pulley.


The last station I had set up was one in which they compared coarse threaded and fine threaded bolts.  I had them turn a nut 20 times on each type bolt and then to measure how far each nut traveled.  We then had them make their own bolts our of pipe cleaners and dowels and to compare the paths up the dowel of the fine threads and the coarse threads.  Finally, I had two pieces of foam board, each one the same length as the pipe cleaner lengths that I had them make their screws out of and we talked about how hard it was to climb up one ramp versus the other.


Overall, these stations were a success.  I would use them again with a bit of tweaking in the pulley station to have them do more hands-on activities in that station.  I would remove the third class lever from the lever station.  The other two stations I would leave as is.

Tuesday, April 19, 2011

Water Exploration with Kindergarten

These are a set of experiments that I did with the kindergarten last year.  I will be doing them again this week.  They were popular with both the kids and the teachers.  I will describe them here, and if you want the write-ups just leave a comment and your email and I will send it to you.  I have not done the classic sink and float here, which is something that the teachers do in class with the students.  I have tried to come up with other experiments that will get the students thinking and having fun.

First, we do a small sink and float with a twist.  I take a small square of tin foil and fold it loosely and float it in the water.  It does float.  You can then take the foil and fold it tightly and it will sink like a rock.  You then ask the kids what happened, and why it happened.  The bigger piece of foil floats because of its greater surface area.  When folded smaller and tighter, it is denser and has less surface area and sinks.  Because of the lighting, it is a bit hard to see, but the piece on the left if floating and the piece on the right is at the bottom of the tub.


Next, we give each child a small square of foil and have them build a small boat.  Then they can load the boat with one penny at a time until it sinks.  They can then see how well each others boats did with loading.  This is a fun experiment that the kids really love.


The next experiment addresses capillary action of the paper towel, and adhesion of the water to the paper towel.  It is a tough concept to explain to kindergartners, so mainly we show them that the paper can pull up some of the water.  It is just a fun project.  The first photo below shows the paper towel with just a dot of food coloring on it, and the second photo shows the paper towel after it has been dipped and held in just a 1/2 inch of water allowing it to spread the color up the paper towel.


Another fun experiment that we do is to address density.  This topic relates back to the idea of sink and float.  If an object is denser than water it floats, less dense it sinks.  In this experiment, we have a glass of water and a glass of alcohol side by side.  We ask the students if ice floats or sinks.  They will answer float and we will drop and ice cube in each glass.  Surprisingly for the students, the ice cube floats in the alcohol.  They will be shocked.  Now ask them what happened.  Teach them how to gently smell the contents of the glass by waving their hand over the glass toward their nose.  They should recognize the smell of the alcohol from the doctor's office.  Explain how ice is more dense than alcohol.  Next, they can use a water dropper to add water to the alcohol jar to let the ice cube rise and the density of the liquid changes with the addition of water.


These are all fun.  We do one more experiment, but because I did not have an assistant today I could not photograph it.  In the last station, we have a tub, a large cup of water and a string.  I ask the students what happens if I pour the water out of the cup, where does it go?  Then I take a wet string and run it from the cup to the tub and pour out the water again.  This time, the water follows the string.  Next, have the students pick out a string and then pour the water.  The string they pick out will be dry and of course the water will not flow down the string.  They will be surprised it doesn't work.  Then wet the string and show them how the water molecules attract each other through cohesion, which is why this experiment works!

Hopefully, I will be able to take some photos of the kids performing some of these experiments.  I am just usually too busy working with the kids to take photos.

Monday, April 18, 2011

Simple Machine Experiments for 3rd Graders

 My next engineering and science session is with the third graders.  The third graders in Virginia study simple machines.  Below is a portion of the science standards regarding simple machines.

The student will investigate and understand simple machines and their uses. Key concepts include
    1. types of simple machines (lever, screw, pulley, wheel and axle, inclined plane, and wedge);
    2. how simple machines function;
    3. compound machines (scissors, wheelbarrow, and bicycle); and
    4. examples of simple and compound machines found in the school, home, and work environment.
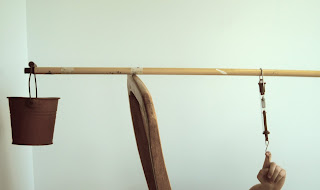
We will use four stations for this session:  levers, inclined planes, pulleys, and screws.  For the first station, we will look at the three classes of levers: class 1, class 2, and class 3.  In the first station using spring scales, the students will be asked to weigh the bucket of rocks as shown below.  I tested this station using 5 Newtons or 500 grams and a 1000 gram or 10 Newton scale.


 I use a broom stick without the broom attached, of course.  For the class 1 lever, an example of which is a see-saw or crowbar, has the fulcrum or support point located between the load and the force or effort which is where the students will place the spring scale to look at how much effort is needed to lift the load they first measured in step 1.  This result is dependent on where you place the fulcrum and where you place the effort, but for the example shown below we found the force needed to support the load was 0.7N or 200 grams.


For the second class lever, the load is located between the fulcrum and the effort or spring scale as shown below.  Examples of a second class lever include a wheelbarrow, nail clippers, and a stapler.  For the configuration shown below, the effort needed to lift the load was 3.7N.


The third class lever is shown below.  It is a rather strange setup that requires someone to hold the lever at the fulcrum.  The load is placed at the end of the lever, the support is in the middle.  This lever requires more force than the load weighs.  It takes 9 1/2 N to support the load of 5N.  This lever is used to gain leverage when more force is needed at the end of the lever.  An example is a pair of tweezers, where the tweezers can supply more force at the end to get out the splinter than you would be able to provide with just your fingernails.


The next station features inclined planes.  In this station, the kids will be asked to weigh a load using the spring gauge.  There is an inclined plane and the students will measure how much force is needed to pull the load up the plane with a height of 6 inches, and then to repeat the process with a height of 12 inches.  In the experiment shown below, I measure the load hanging on the spring scale as 210 grams, up the 6 inch incline as 100 grams and up the 12 inch incline as 120 grams.


The pulley station has two setups, one for a single pulley, and one for a double pulley.  This station will already be setup, the kids will measure the force needed to lift the load without a pulley, with a single pulley and with the double pulley as shown below.


The final setup will be for screws.  In this setup, I will have a dowel with five inches marked at each end.  The students will be asked to wrap the pipe cleaners around five inches of the dowel.


They can then see that the shorter piece takes fewer turns to go up the five inches, but is steeper.  I will also have two boards or pieces of foam board cut to the same lengths as both these pieces of pipe cleaner.  The students will be able to see that it takes less work to climb up the longer ramp than the shorter, steeper ramp, just as theoretically it would take less work to use a screw with finer screw threads than coarser threads, but it would take more time to screw it in. 

Finally, I will have the kids compare two bolts, one with fine threads, the other with coarse threads.  They will turn the nuts 20 times each for each bolt and see how far that translates into linear distance as shown in the photos below. 


If you would like to receive a write-up of this unit, please get in touch.